Ownership And The File Manager
FirstMagic web publishing is permission-based: anybody with an account can sign into it, but what an authenticated user can see and do depends on personal Account Privileges. These are determined by the Site Owner, and can be unique for every user and different for each web page.
While such privileges can be very granular, there are three basic distinctions:
- Site Owner: owns everything, and can create, edit, and delete anything. The Site Owner is automatically Page Owner to absolutely all pages.
- Page Owner: owns specific pages, and can only create / edit / delete these.
- Subscriber: can subscribe to areas of the site, and can be Page Owners to content within.
All authenticated users have a personal Account Panel, but only Site and Page Owners have the File Manager. You can only create new pages in a Layout where the File Manager exists for you.
THE ACCOUNT PANEL
The options available here will be specific to your account.
The top-most button is context-sensitive, and will always be the most likely Action to perform on the page you are currently on. In this example, Jane Smith's most likely action is to Edit the current page.
Sign Out: for signing out of your account.
Change Password: do it often!
Site Setup: only the Site Owner will have this button and the paint roller icon associated with it. Site Setup determines all properties of the website, while the paint roller icon opens the Theme Designer.
InBox: only the Site Owner has this button. If you have created Response Forms anywhere on the site, forms filled out by your visitors will arrive here.
Help: a link to this User Guide or any other support resources the Administrator may have assigned.
Suppress Warning Dialogs: if checked, you will not get warnings when trying to delete web pages or Layouts.
Red/gray slider: the amount of available disk space you have left at any given time. Hover the mouse over it for details. If the slider does not exist, you have unlimited disk space.
Note: if you have a Mail Notification, the Account Panel will automatically open. It will stay open until all your mail is marked as Read.
THE FILE MANAGER
 The File Manager is the slideout shelf in the right margin of all web pages you have owner privileges to. Open it by clicking the hamburger icon in the upper right corner. It stays open until you close it again.
Tip: single-clicking the hamburger will open the File Manager on top of the page. Double-clicking it will push the web page leftwards instead.
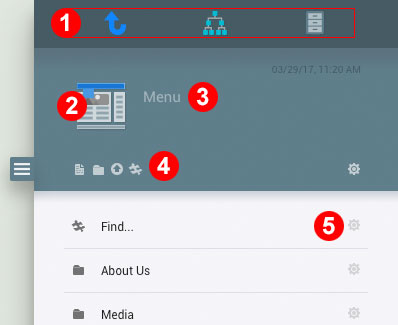
The File Manager has two sections: Header and Body. The Header represents the current web page, while the Body is all the resources the current page contains. In a document, the Body will be all the document's file attachments and images. In a Layout, it will be all its sub-pages.
The File Manager Header
[1] Global Navigation - from left to right
- Blue Up Arrow Icon: click to move One Level Up in the site hierarchy. Drag-and-drop a page from the File Manager Body onto it to move the page instead.
- Green Sitemap Icon: click to go to the Website Root. Drop a page from the Body onto it to move it to the Root.
- Grey Archive Icon: click to go to the Website Archive. Drop a page onto it to move it there.
[2] Icon: this page's Icon. It shows you what kind of web page this is. The icon is droppable - you can drag-and-drop files from your computer onto it to upload large numbers of files in one single operation, instead of using the Upload Button.
[3] Page Title: where you set the title of this page - click to edit it. Note: to change the URL fragment - the filename - double-click the Title Field, and the URL field becomes active instead. Changing the URL will not change the title.
[3b] Keywords: you can write Content Keywords directly below the Page Title, and Search Engines like Google will discover them. Note: a page with no keywords will inherit the Global Keywords defined in Site Setup. Page Keywords always take precedence over Global Keywords.
[4] Actions: default Actions for this page. In a Layout, this will be template pickers to create sub-pages. In a Document, it will be the Text Editor and an Upload button. The Gears Icon to the right contains More Actions - tools to customize the page even more [Sort Order, special features like adding a Byline or a Custom Sidebar, etc]. More Actions also have the same publish/unpublish button you can find in list view, as well as buttons to Protect / Unprotect the page.
Everything the current page contains is listed here; in Layouts, all its sub-pages, in Pages, all its uploads [5].
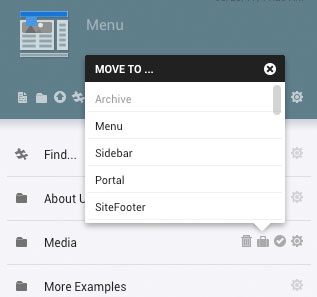
Layouts have several possible Actions for a given sub-page or uploaded file: to move something, grab its icon [the little grey icon to the left of its name], then drag-and-drop it somewhere else. It can be dropped on the Global Navigation icons [Up One Level | Root | Archive], or onto any Layout in the same list as itself [any icon that looks like a folder], or on any shortcut you have in your personal Account Panel.
Tip: you can create shortcuts to any Layout by hovering the mouse above your Account Panel while you are inside that particular Layout. A little Plus Sign will appear to the left of your name. Clicking it will add a shortcut to your Dashboard. Any shortcuts on your Dashboard will also appear in your Account Panel.
More Actions [the Gears Icon] offers other ways of moving the object, as well as publish/unpublish and Delete.
Pages have fewer options in List View; delete, view, and download any file attachments the page might have.
MOBILE ACCESS
On Mobile browsers, the Account Panel and the File Manager is merged into one compact, app-like panel with rudimentary functionality. From there, you can:
- Create, edit, and delete Blog Posts and Web Pages
- Capture or upload images into Blog Posts, Web Pages and Galleries
To perform more complex operations, you can either sign in with a Desktop Browser, or switch your Mobile Browser to Desktop Mode.

